A translation (via Google) of the “Connection of Peripherals” manual which came with the Didaktik Gama ‘89’ model. Scans of the original can be found on archive.org here.
DIDAKTIK GAMA
PERSONAL MICROCOMPUTER
HC
CONNECTION OF PERIPHERALS
(p.1)
Dear customers !
At the end of 1987, after a short but intensive production preparation, we commissioned the production of the Personal microcomputer Didaktik Gama. By the end of 1988, we produced 8,000 units and we expect a significant increase in production - up to 25,000 units in 1989.
It is quite natural that the launch of this product on the market caused a great response. The computer has been subjected to the most rigorous testing - testing by customers. Hundreds of comments and suggestions came in, and this stream of customer feedback is still alive.
For us, as a manufacturer, these sheets are an invaluable source of small and large innovations, positive modifications, elimination of “childish” errors and product defects.
Based on these comments, we (to the benefit of the computer and its users) gradually implemented a series of adjustments and measures. I will mention at least the most important ones:
-
We extended the one-year warranty period by one year of free repairs (this measure applies to all manufactured computers)
-
We added a useful “RESET” button to the computer design, a colour signal modulator and a direct video output (their use significantly improves image quality). We carry out these modifications free of charge at the request of customers even on earlier manufactured computers.
-
We expanded the user manual
-
We improved the communication system with the tape recorder
-
We are currently implementing a whole range of technical measures, which their goal is to significantly increase the operating reliability of the computer so that we reduce the costs of warranty and post-warranty repairs to a minimum.
(p.2)
The new manual you received also belongs to the mentioned series of our positive response to user letters. It was written by us development staff Ing. P. Kuba and RNDr. R. Iska. In an understandable way, it answers the technical questions that most often appeared in your letters. Together with the authors, I believe that they will make your work with necessary peripheral devices easier and will enable you to make better and fuller use of the useful features of the computer.
We are ready to continue to provide you with individual technical assistance and all necessary information. Although we may not succeed in every single case, our main goal is the satisfaction of you, our customers. Therefore, we will continue to be grateful for all comments - both complimentary and critical.
Ing. Klemon Viktor director of the DIDAKTIK plant
(p.3)
CONTENTS
- Circuit
- Kempston Joystick connection for Didaktik Gama microcomputer
- Connecting the tape recorder to the Didaktik Gama microcomputer
- Tuning the image of the Didaktik Gama microcomputer on the TV receiver
- Connecting the cassette tape unit SP 210 T
- Connecting the BT100 printer to the Didaktik Gama microcomputer
- Connecting the Gamacentrum typing station to the Didaktik Gama microcomputer
- Connecting the D 100 printer with the CENTRONICS interface to the Didaktik Gama microcomputer
- Connecting the PRT 88 GS printer with the CENTRONICS interface to the Didaktik Gama microcomputer
- Connecting the Consul 2111 printer to the Didaktik Gama microcomputer
- Connecting the Didaktik Z coordinate recorder to the Didaktik Gama microcomputer
- Connecting the Didaktik Z2 Collaborator with its own intelligence to the Didaktik Gama microcomputer
- Working with memory banks of Didaktik Gama microcomputer
(p.4)
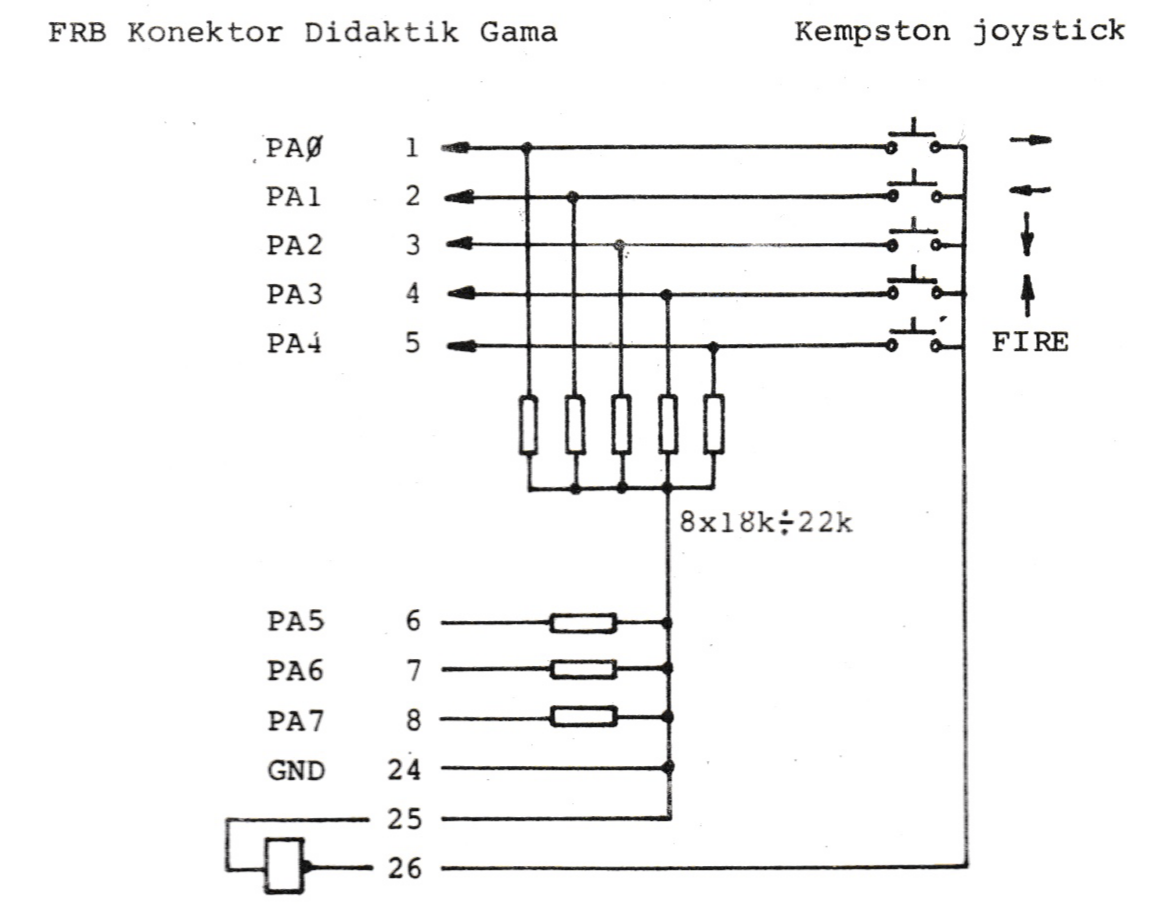
Connecting a Kempston type joystick to the Didaktik Gama microcomputer
Manufacturer: Kovodružstvo Náchod
It is not necessary to use the interface from Kovodružstvo Náchod to connect the joystick. The interface is built into the Didaktik Gama microcomputer.
The joystick can be connected to the Didaktik Gama microcomputer using a reducer, which we can send to you on order.
In games and programs intended for the ZX Spectrum microcomputer, which use 2 joysticks, it is not possible to use a second joystick connected to the FRB connector. These programs use a port different from the port of the MHB 8255 circuit to address the second joystick. In order to use the second joystick, it is necessary to change the port address for the second joystick in the mentioned games and programs to the value 3FH = 63 D and connect the second joystick to port B of the MHB 8255 circuit with the same in the same way as the first joystick to port A .
(p.5)
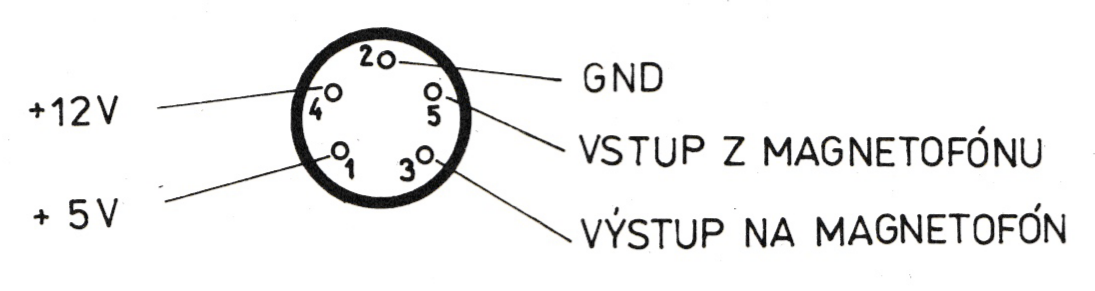
Connecting the tape recorder to the Didaktik Gama microcomputer
Minimum input voltage from the tape recorder to the microcomputer: 300 mV Minimum output voltage from the computer to the tape recorder: 50mv
When using the tape recorder in cooperation with the Didaktik Gama microcomputer, follow these instructions:
-
if you suspect improper cooperation with the tape recorder, try to record the program from the computer to the cassette and from the same tape recorder back to the microcomputer or verify the recording. If the verification takes place without error, cooperation with the tape recorder is fine. Otherwise, send the computer with a description of the error to our service department.
-
if you have a recording from another tape recorder and your microcomputer does not want to record it, try setting the recording head of the tape recorder to the clearest signal, while the red and blue stripes on the edge of the screen during recording should be approximately the same width. In addition, in the case of speaker output, adjust the volume and treble.
-
if, after several attempts, you manage to record an important program from the cassette, record it immediately on your tape recorder. This will eliminate unnecessary attempts at the next recording of this program.
-
record defects on your tape recorder with the same set recording head.
-
clean the lubrication and sensing head regularly.
Connection of the circular input-output connector when looking from behind on the microcomputer
(p.6)
Tuning the image of the Didaktik Gama microcomputer on the TV receiver
A black-and-white or color television receiver operating in the PAL standard is used as the display unit for the Didaktik Gama microcomputer. Since we currently do not have a monitor available, which is much more suitable as a display unit for a microcomputer, it is necessary to deal with the problems of display on the TV receiver. We would like to give you the following recommendations on this issue:
-
if you have a TV set that has separate VHF and UHF inputs, connect the microcomputer to the UHF input and remove the antenna from the VHF input
-
after fine-tuning the entire working band of the TV modulator, tune the microcomputer to the place where the picture is of the highest quality. Please note that the working range of the modulator is quite narrow and when the microcomputer is heated, the modulator is slightly debugged
-
if your TV receiver has a VCR input and you have the appropriate connector, connect the VIDEO output of the microcomputer to the VCR input. Then you don’t have to tune the picture at all.
-
a feature of the microcomputer is 16 vertical stripes on the screen, which must be suppressed by the correct setting of contrast and brightness on the TV receiver. Another possibility is to enter the commands: BORDER 0 : PAPER 0 : INK 7 : CLS. After executing these commands, the screen has a black background and white letters. This mode of operation suppresses vertical stripes and is suitable for programming because it wipes your eyes.
(p.7)
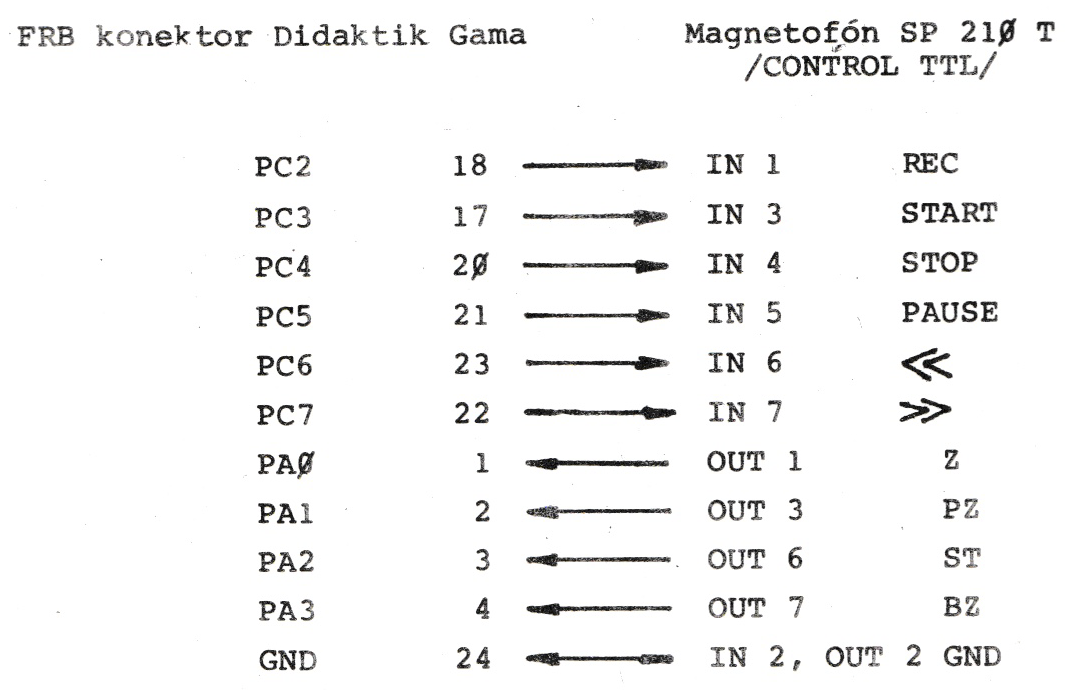
Connecting the cassette tape unit SP 210 T
Manufacturer: Tesla Přelouč
To use the printer after connecting according to this instruction, you need a utility program, which you can order on a cassette together with a printed instruction for a price of 65 Kcs. According to the instructions attached to the cassette, you can also connect the remote control of the tape recorder with a computer and control the tape recorder using the OUT instruction.
(p.8)
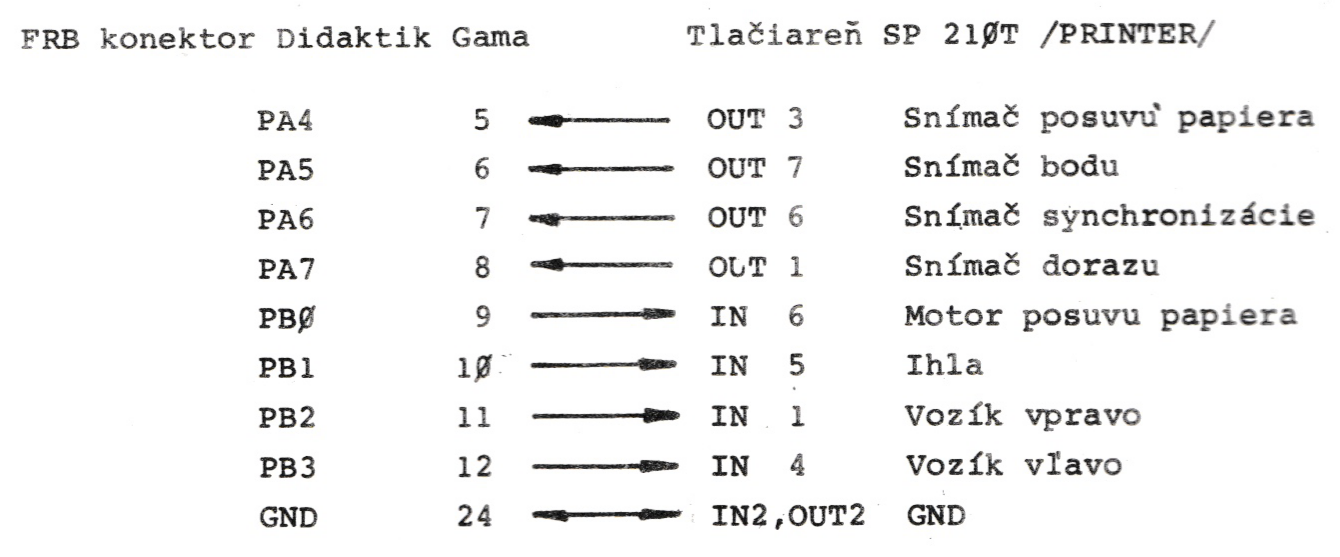
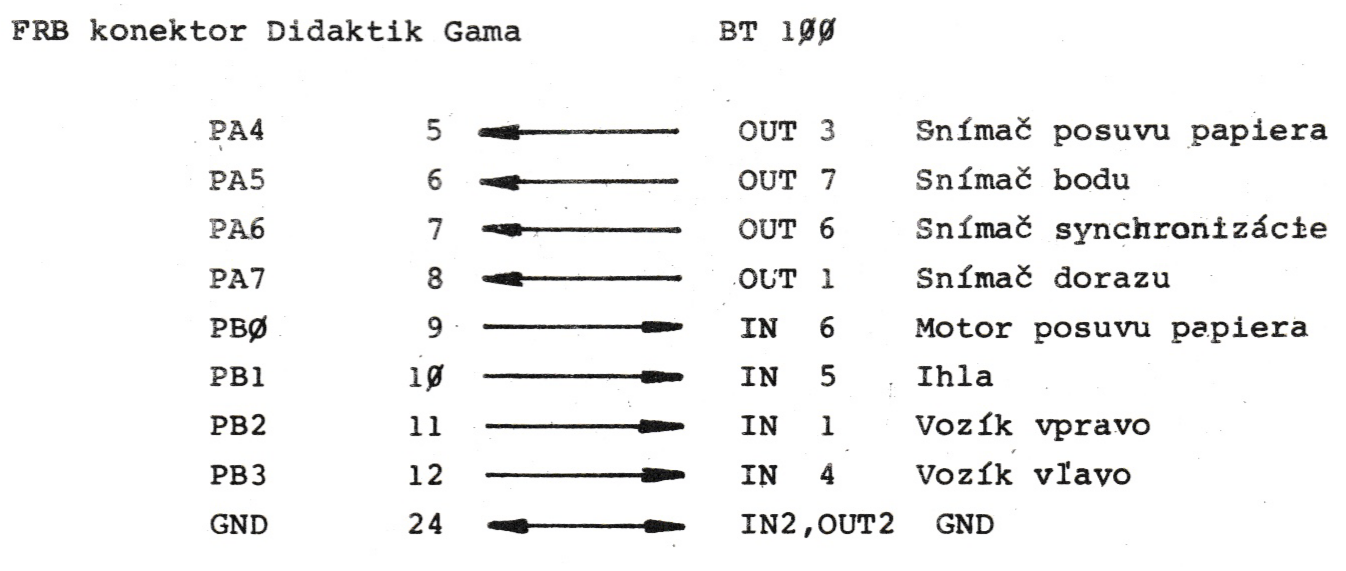
Connecting the BT 100 printer to the Didaktik Gama microcomputer
Manufacturer: Tesla Přelouč
To use the printer after connecting it according to this manual, you need an operating program, which you can order on a cassette together with a printed manual for the price of 65 Kcs.
(p.9)
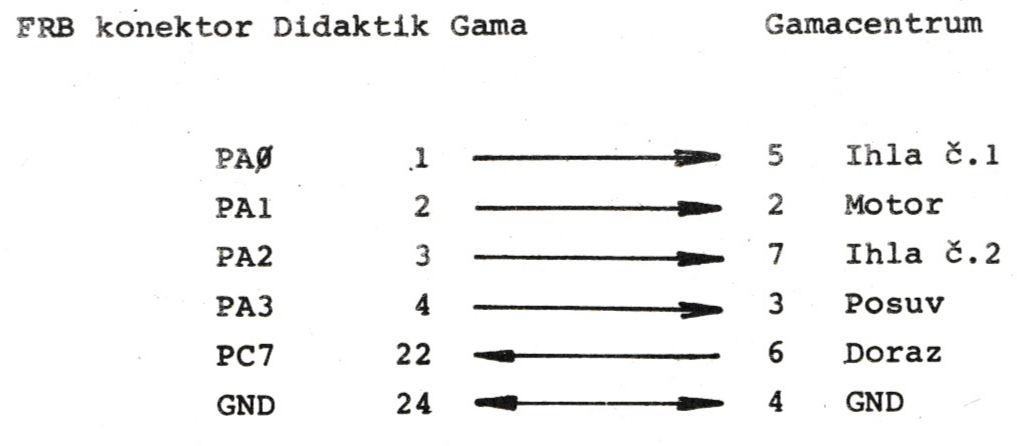
Connecting the Gamacentrum printer to the Didaktik Gama microcomputer
Manufacturer: Gama Milevsko
To use the printer connected according to this instruction, it is necessary to order the operating program on cassette for 65 Kcs. When operating the printer, follow the instructions provided by its manufacturer.
(p.10)
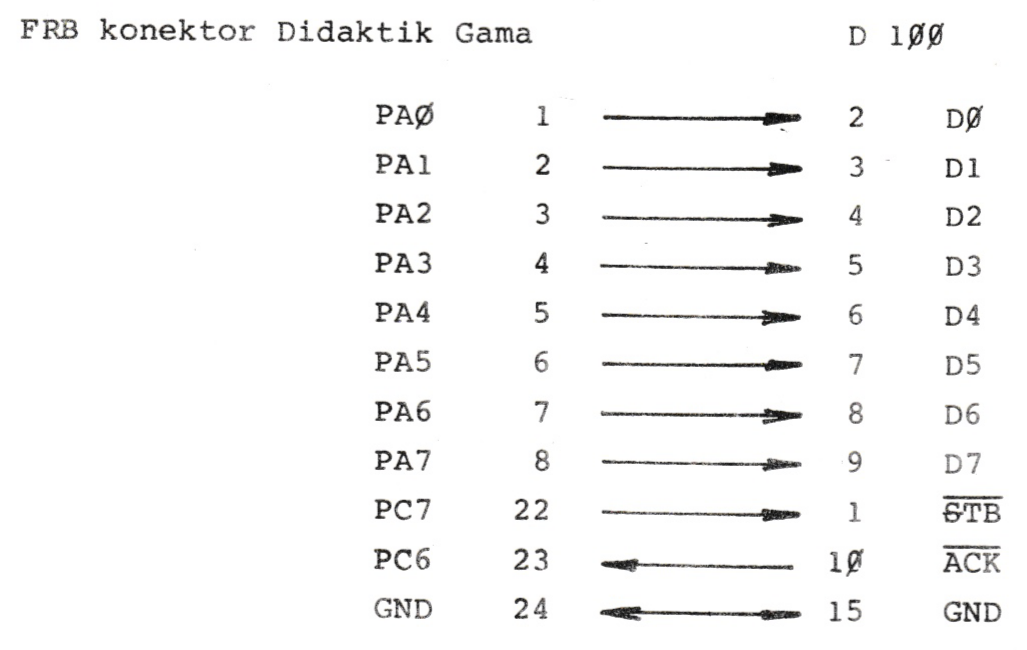
Connecting the D 100 printer with the CENTRONICS interface to the Didaktik Gama microcomputer
Manufacturer: import PLR
After connecting the printer according to this manual, the microcomputer communicates with it using the MHB 8255 circuit model /handshake/. You can initialize this circuit with the command LLIST line number, where the line number is higher than the number of the last line of the program, or with two instructions OUT 127, 160 : OUT 127, 13. After initialization, the computer is ready to communicate with the printer. Printer control codes can be sent using the command LPRINT CHR$ (control code).
(p.11)
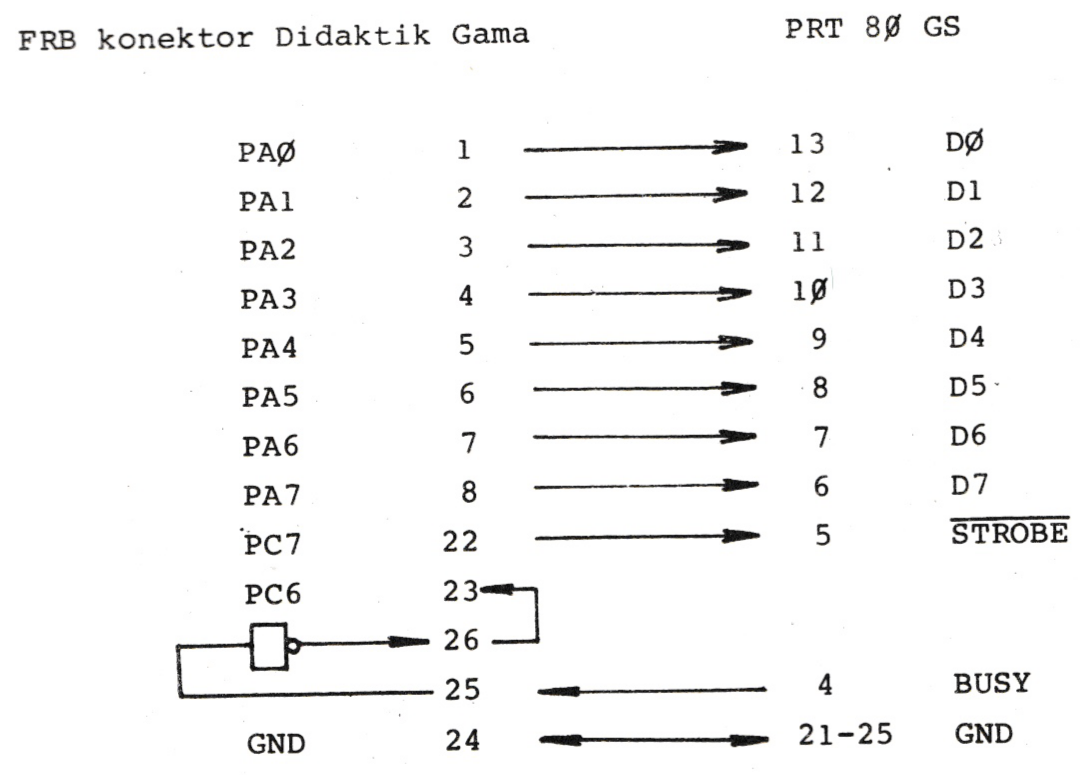
Connecting the PRT 80 GS printer with the CENTRONICS interface to the Didaktik Gama microcomputer
Manufacturer: import MLR
After connecting the printer, initialize the MHB 8255 circuit using the command LLIST line number, where the line number is higher than the number of the last line of the program, or with two instructions OUT 127,160 : OUT 127,13.
(p.12)
Connection of the CONSUL 2111 printer to the Didaktik Gama microcomputer
Manufacturer: Zbrojovka Brno
After connecting the printer according to these instructions, initialize the MHB 8255 circuit using the command LLIST line number, where the line number is higher than the number of the last line of the program, or with two instructions OUT 127,160 : OUT 127, 13.

(p.13)
Connecting the Didaktik Z coordinate recorder to the Didaktik Gama microcomputer
Manufacturer: Didaktik Skalica
To use the recorder connected to the Didaktik Gama microcomputer according to this manual, an operating program is required, which you can order on a cassette together with a printed supplement to the instructions for operating the coordinate recorder. Please note that this program is not suitable for controlling the ALFI coordinate recorder.
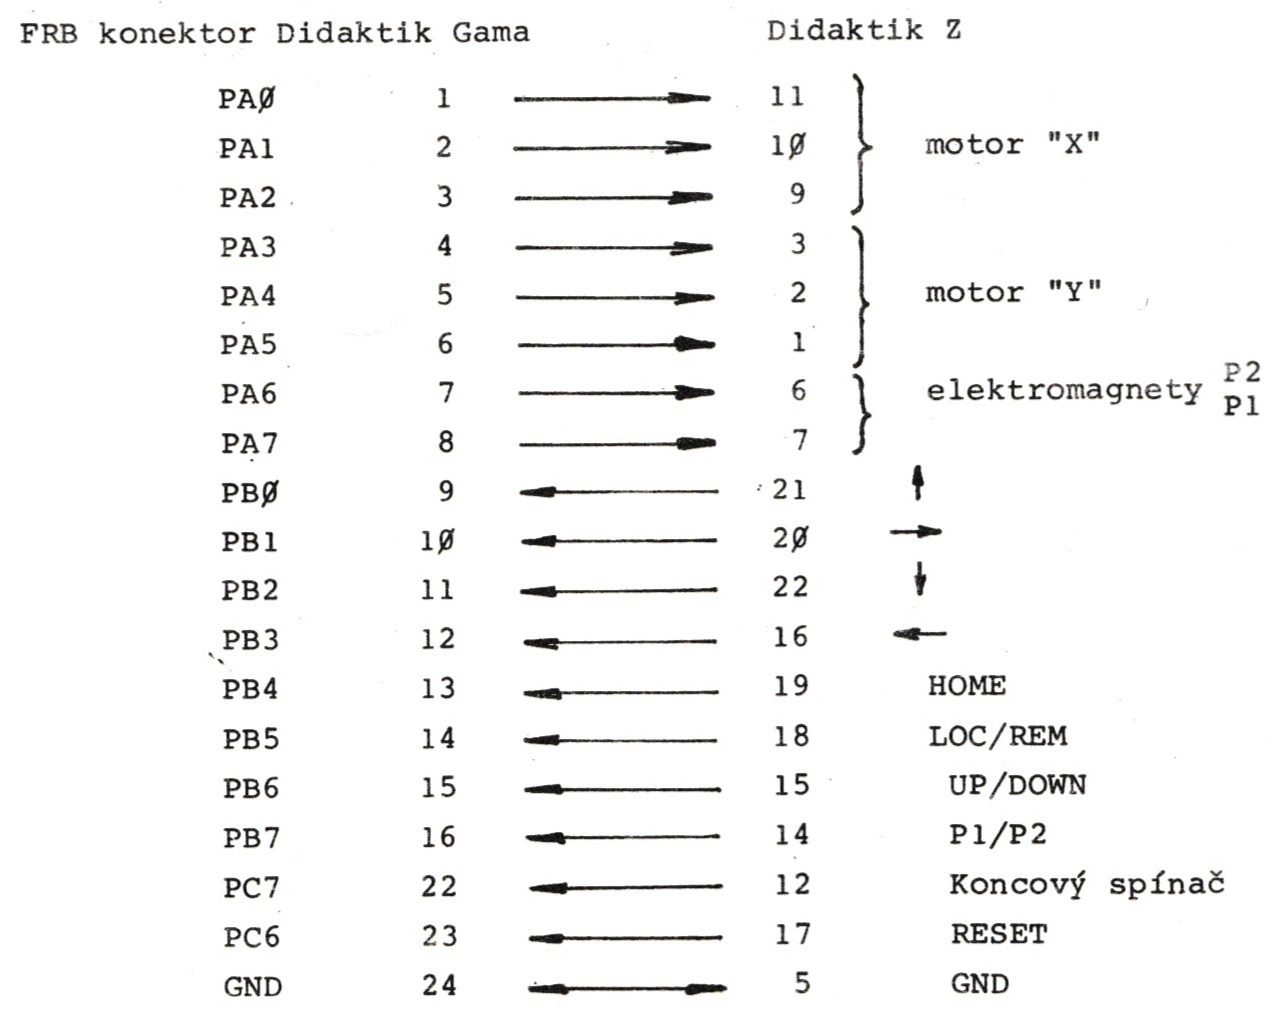
(p.14)
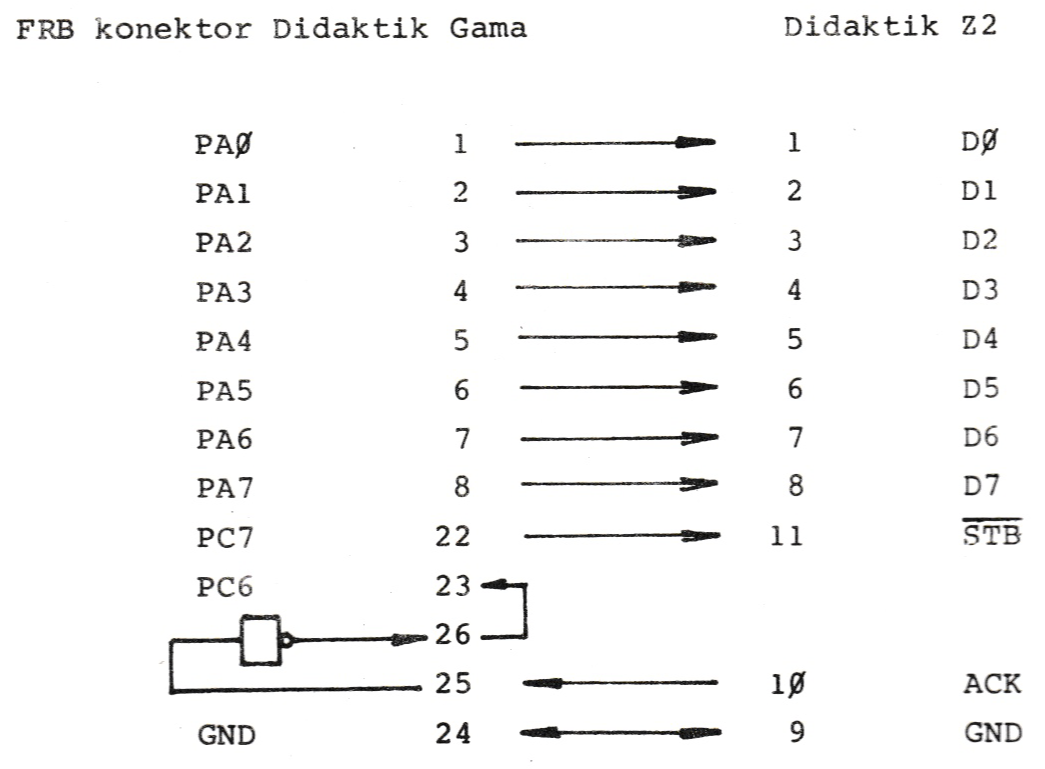
Connecting the Didaktik Z2 coordinate recorder with its own intelligence to the Didaktik Gama microcomputer
Manufacturer: Didaktik Skalica
The recording operation is the same as the operation of any other peripheral device cooperating with the microcomputer in the MHB 8255 circuit model /handshake/. An operating program is not required for communication, follow the operating instructions that are part of the recorder’s delivery.
(p.15)
Working with memory banks of Didaktik Gama microcomputer
For a better use of 80kB of RAM in the Didaktik Gama microcomputer, we present a program that illustrates this use:
EXAMPLE:
The microcomputer can be used to receive telegraphy. Let’s assume that we have created a subroutine for receiving one character ACCEPT, which has the code of the received character in the variable SIGN. We want to receive the text and store it in memory for further use, e.g. printout. We will save received characters from address 32768, setting RAMTOP to the value 32767. Classic Spectrum can store 32768 characters in memory, i.e. about 8.5 pages of text /64 characters per line, 60 lines/.
10 CLEAR 32767                                                  set RAMTOP
20 LET MEM = 32768                                              memory start setting
30 LET BANK = 0                                                 the active bank
40 GO SUB PRIJMI                                                accept character into variable CHARACTER
50 POKE MEM,ZNAK                                                save the character to the MEM address
70 LET MEM = MEM + 1
80 IF MEM= 65536 THEN LET MEM = 32768: LET BANK = 1: OUT 127,1  switching banks
90 GO TO 40
This program loads received characters into both memory banks. Please note that the end of receiving characters, which could be on line 60, is not marked here. With this program, 65536 characters can be stored in the memory of the Didaktik Gama microcomputer, which is about 17 pages of text.
We can then use the following program for the output to the printer:
100 IF BANK = 1 THEN OUT 127,0
110 LET KMEM = MEM-1                            MEM is set to the address of the last received character
120 IF BANK = 1 THEN: FOR I = 32768 TO 65535 : LPRINT CHR$ (PEEK (I)): NEXT I : OUT 127,1
130 FOR I = 32768 TO KMEM : LPRINT CHR$ (PEEK (I)): NEXT I
(p.16)
In case the text was saved in both banks, line 20 provides a list of characters stored in bank 0 and switching to bank 1. If bank 1 was not used, line 30 provides a list of all characters stored in bank 0 up to the KMEM address. If bank 1 was used, line 30 provides a printout of the remaining characters in bank 1 to address KMEM.